Wall reinforcement
Installation of longitudinal and transverse reinforcement in walls
General information
All geometrical dimensions are in millimeters.
When reinforcing walls, several technologies are available for exposing reinforcement to the design position. Some of the most common are grouping of reinforcing bars into prefabricated frames and tying reinforcing bars at the construction site. The add-in allows you to simulate both methods.
No grouping is required for knitted reinforcement. For reinforcement with frameworks and vice versa.
There are two methods for grouping reinforcing bars in Revit, Create Assembly and Create Group. At the moment, the add-in implements the merge method through the "Create Assembly" tool.
All add-on features:
- Frames (all) - all wireframes of the selected wall are modeled. The number of frames in the wall depends on the step set by the user in the "Unfold Wall" tab.
- Frames (generate only frame one with total) - to reduce the number of identical frames in each specific wall, it is possible to use the method of automatic counting of their number. (for more details see below)
- Horizontal rebars - Enable / disable the generation of horizontal reinforcing bars in the wall
- Vertical rebars above opening - Enable / disable the generation of vertical reinforcing bars in the area above the opening. The add-in does not create wireframes in the opening areas, generating the bars separately.
- Vertical rebars under opening - Enable / disable the generation of vertical reinforcing bars in the area under the opening. The add-in does not create wireframes in the opening areas, generating the bars separately.
- Cross bars in the area of openings - Enable / disable the generation of cross bars in the area above and below the openings
- Tie rebar in reinforcement openings - Enable / disable the generation of reinforcement bars that frame openings and holes
- Ignore openings with the name of the family / Ignore highlighted openings - Function for the add-in to ignore holes made using the Window family. In the form, you must write the name of the family, which must be ignored. Ignoring the reinforcement of the holes is required in the case of small holes in the walls, less than the main step of the reinforcement.
- U-rebars framing aperture - Enable / disable the generation of U-shaped reinforcing bars in the framing of holes
- Corner U-rebars - Enable / disable the generation of U-shaped reinforcing bars along the edges of the walls to their full height
- Reinforcements from the plate - Enable / disable generation of outlets from slabs and foundations into overlying walls
- Automatic placement of U-rebars - Installation of U-shaped bars with the same spacing, frequent, cover layers as horizontal reinforcement
Frames (generate only one with an indication of the total number) - to reduce the number of identical frames in each specific wall, it is possible to use a method for automatically counting their number. This method is designed to speed up the introduction of changes to the documentation, reduce the volume of the model and the elements that need to be controlled.
The add-in calculates the number of frames in each specific wall, generates only one, and writes the number of the rest into the parameter specified by the user in the form window.
The following formula should be present in the final rebar counting specifications:
Quantity x Number x AllNumber, where
Quantity / Number (parameter, default is 1)
Example: each has 3 identical walls, each wall has 40 frames. The table shows the formula for calculating the total amount as follows: 1 x 40 x 3. These 40 frames can be created both physically and conditionally, depending on the option selected.
Number (a custom parameter that specifies the number of skeletons in wall instances, filled with an add-in, by default 1, you need to add add to the "Assemblies" category)
AllNumber (custom parameter specifying the number of identical walls is filled in, default is equal to 1)
For correct calculation of the specifications, the User parameters "Number" and "AllNumber" must also be added to the forms of reinforcing bars used in the project. Each parameter must be created as a "General Parameter", when added to the form, have a value of 1.
Instructions for creating and adding a custom program:
In the Project, select the Control tab> Parameters> General parameters
Browse> Select the General Options txt file. Make sure you have edit permissions for this file.
Create> Name: Number; Category: Structural reinforcement (for forms) \ Assemblies (for assemblies); Data type: Other
Tabs overview of the «Wall Reinforcement» add-in
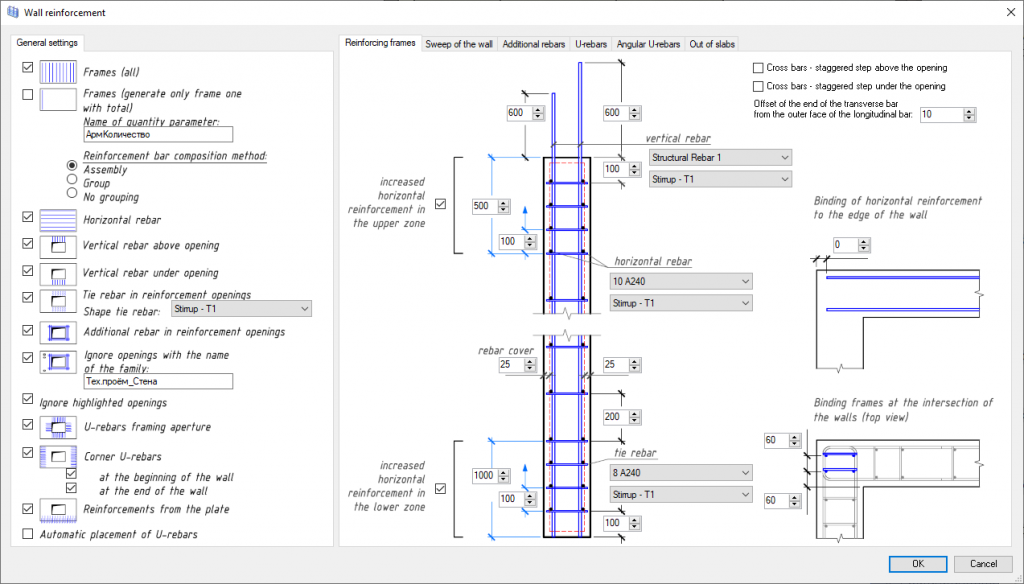
- Reinforcing frames
This tab contains the main options for modeling reinforcement, changing the geometric characteristics of the frame in a sectional wall view. It is also possible to set indents of reinforcing bars from the edges of the wall, setting a checkerboard pitch for transverse reinforcement.
Snapping skeletons at intersections of walls - the ability to specify snapping of skeletons to the edges of the wall at the intersection of the reinforced wall with other walls. The algorithm takes into account the way the walls are joined to each other and always puts the frames in the element, part of which belongs to the joint. The figure shows the main wall in gray and the adjoining one in blue.
- Sweep of the wall
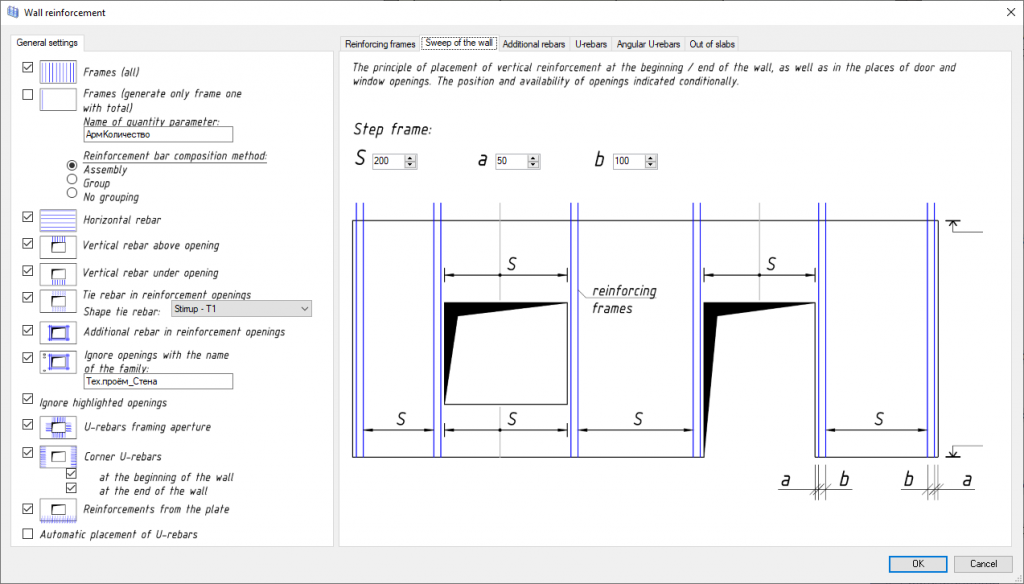
Sweep of the wall - a tab that contains settings for the placement of frames and individual rods in the wall in the side view. The number of windows and doors in the figure of the form is shown conditionally. Any opening that does not have a section of the wall under the opening itself is recognized by the program as a window. The categories of the families "Window" and "Door" are also automatically determined.
- Additional rebars
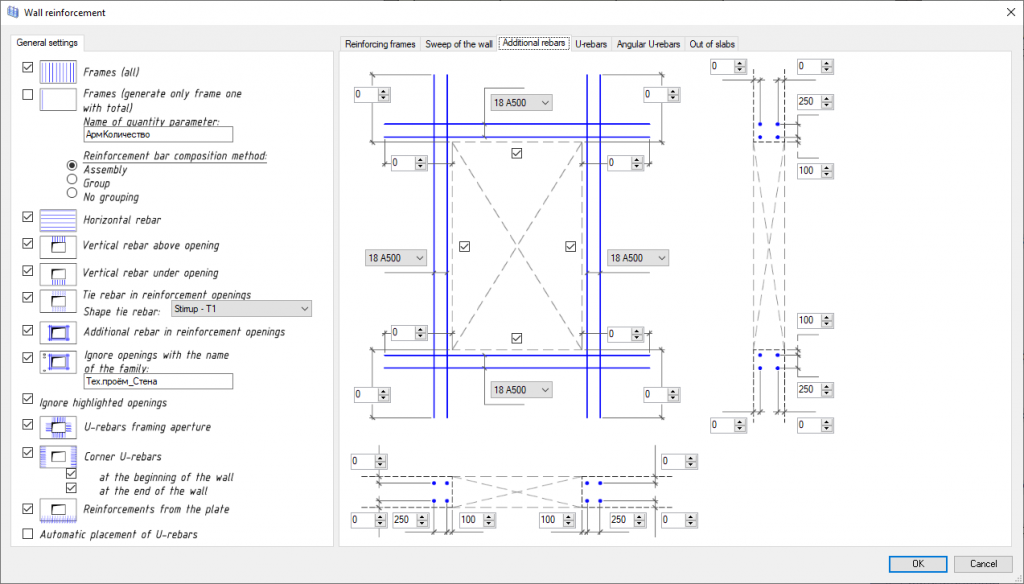
Adjust the geometric characteristics of the reinforcement bars that frame the openings in the walls. It is possible to select the type \ diameter of the reinforcing bar from the standard sizes of the families already available in this project.
- U-rebars
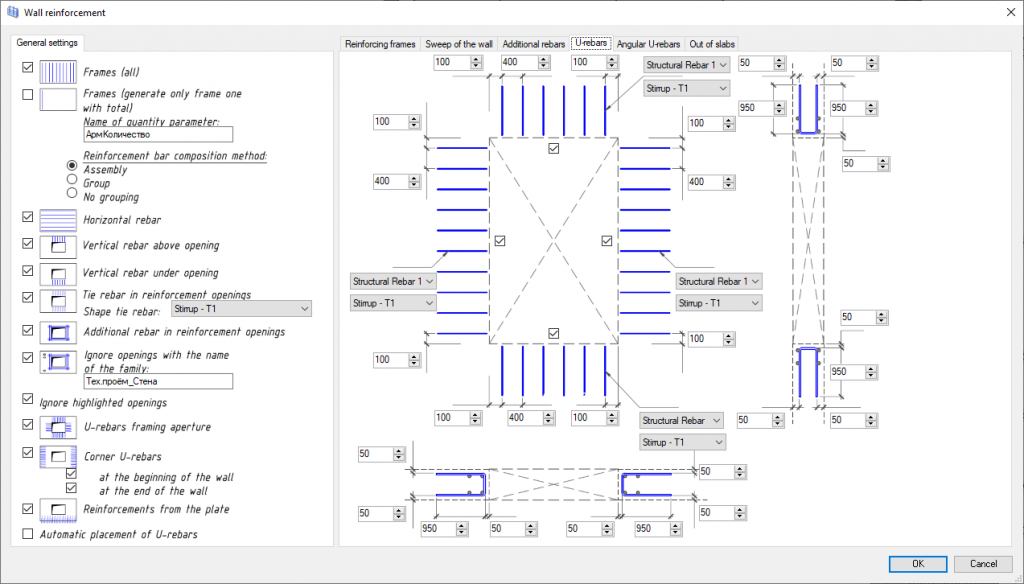
Setting the geometric characteristics of the U-shaped bars that frame the openings in the walls. It is possible to select the type \ diameter of the reinforcing bar from the standard sizes of the families already available in this project.
- Angular U-rebars
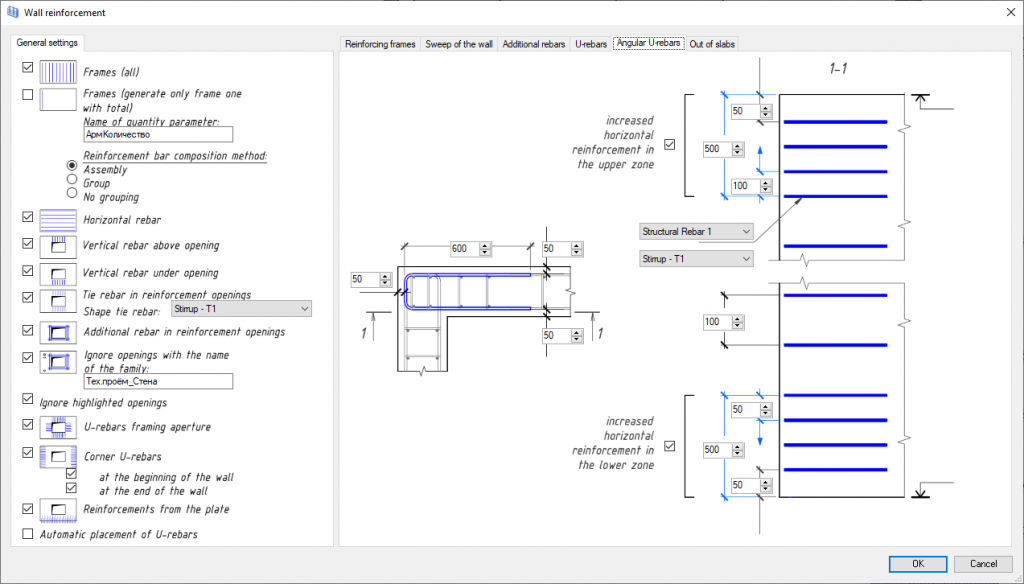
Setting the geometric characteristics of U-shaped bars located along the edges of the walls. It is possible to select the type \ diameter of the reinforcing bar from the standard sizes of the families already available in this project.
When the checkbox is enabled in the left part of the "Automatic placement of U-bars" window, the possibility of setting cover layers along the main edges of the wall, the step of U-bars and increasing these steps disappears. In this case, the dimensions are accepted in the same way as those assigned for vertical reinforcement on the "Frames" tab.
- Out of slabs
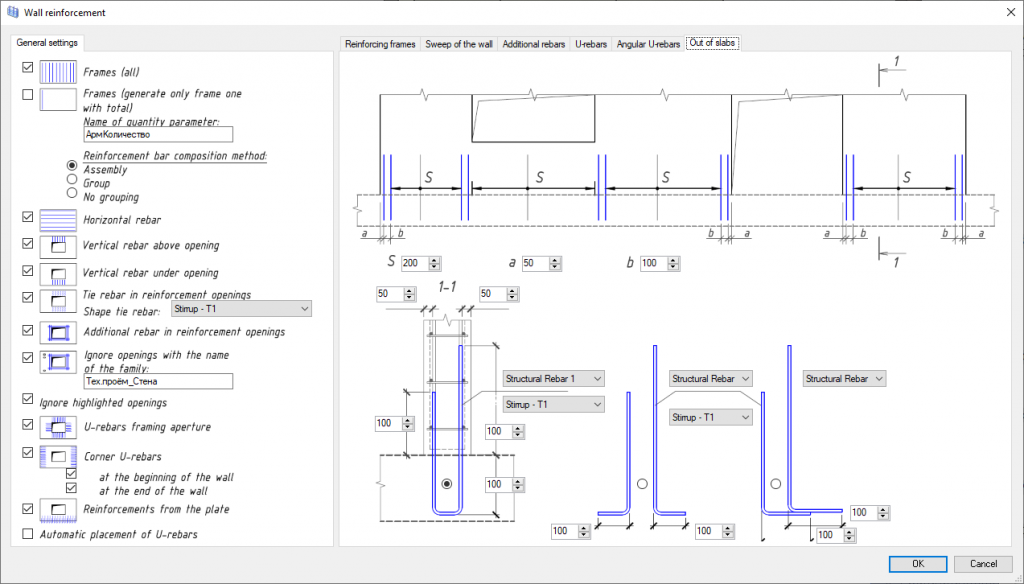
Set up the geometric properties of outlet bars from floor slabs and foundation slabs. It is possible to select the type \ diameter of the reinforcing bar from the standard sizes of the families already available in this project.
Important: After this add-in has been triggered, for the installed bars in the model, you must change the base label from the walls to the required slabs.
- Automatic placement of U-rebars
In most cases, the U-bar is an anchoring element for vertical and horizontal reinforcement, therefore its location strongly depends on the spacing of the horizontal and vertical reinforcement.
The plugin automatically places bars at intersections of walls, framing openings, in accordance with the step of horizontal and vertical reinforcement.