Ceiling finishing
Creates ceiling finishes
- Choose premises
- Set the level at which the ceilings will be built
- To assign ceilings to a room, select from which room parameter and to which ceiling parameter to transfer the value.
- Assign a ceiling type to each room type
- Click "Create Ceilings"
Feature Features
- The function cannot create ceilings with rounded edges.
- For version 2022 and later, the ceiling is built with the Ceiling category.
- For versions 2019–2021, there is a choice of methods for constructing the ceiling. To do this, you need to "Enable" or "Disable" the checkbox "Model by floors".
Checkbox Disabled - simulate elements of the "Ceiling" category
Checkbox Enabled - simulate elements of the "Overlap" category
Before constructing ceilings in the entire building, it is necessary, on the side of the building, to create one auxiliary ceiling with the largest number of faces.
This is due to the fact that the Revit API does not have a function to create a ceiling, but it is possible to copy and change the number of faces. The function itself copies, positions, changes the type for copies of the additional ceiling, but it cannot increase the number of its faces.
Errors and Warnings
- "ONLY straight lines are allowed in the contour"
The function cannot create ceilings with rounded edges. - “Ceiling pattern not found. Manually create a ceiling”
You need to increase the number of faces of the additional ceiling and reuse the function. - "Build a sketch with errors?"
The function displays this message when it encounters a room contour error during construction. When you click "Yes", it draws detail lines on the plan so that the user can determine the place in the contour that causes the program error.
If you chose to build a contour, you found an error, you can simply roll back one step Ctrl + Z and the contour will be deleted by itself.
Contour update
Changes the contour of the ceiling to the new contour of the room.
The function does not create a new ceiling and saves tags when the number of ceiling faces does not change during the update.
The function re-creates the ceiling and removes marks when the number of ceiling faces changes.
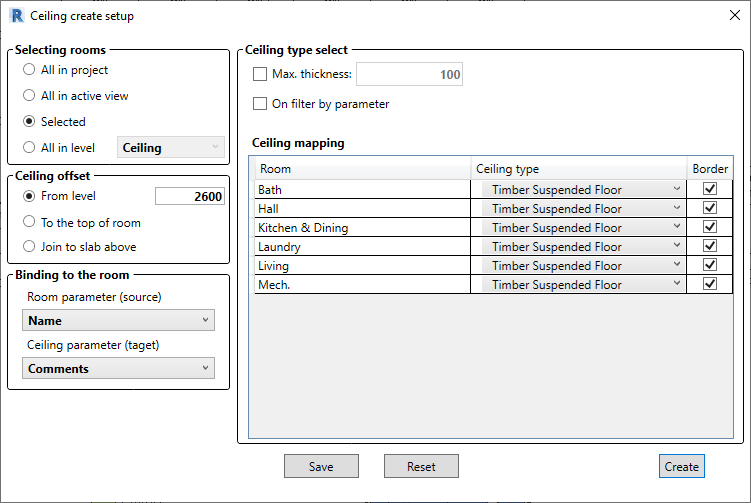
Room selection
- All in project - building ceilings for all rooms in the project
- All in active view – building ceilings only for rooms displayed in the active view
- Selected - construction of ceilings only for selected rooms
- All on level - construction of ceilings only for rooms located on the floor selected by the user
Ceiling offset
- From level - the value is set in mm, the user must set the required height relative to the floor level
- To the top of room - the ceiling level is equal to the value of the "Offset from above" parameter of the selected room.
- Join to slab above – the program automatically determines the elevation of the ceiling that limits the room from above, the thickness of the ceiling selected by the user, and lays the ceiling along the ceiling.
Binding to the room
To assign ceilings to a room, select from which room parameter and to which ceiling parameter the value should be passed.
Choice type select
For the convenience of further selection of ceilings, filters are selected in the upper part of the window:
- Maximum thickness - filters by the thickness of the ceiling type
- Filter by parameter - filters by the parameter and value specified by the user in the ceiling type
Setting ceiling options
In the tabular section, each room is assigned a type of ceilings:
- Room - this column contains all the values of the "Name" and "Destination" parameters of the rooms
- Ceiling finish - type of ceilings selected by the user
- Boundary – whether to add the “Room boundary” feature for the created ceilings
Save - saves all form settings
Reset - restores the values saved before the launch of the settings window
Create Ceilings - creates floors based on user-specified parameters